

35 Primavera P6 Tips, Tricks and Shortcuts Schedulers Can’t Do Without
Looking to upgrade your Primavera P6 knowledge with some handy Primavera P6 tips and tricks?
As many schedulers are aware, Primavera P6 is a complicated and sophisticated project management and planning and scheduling tool utilized in a variety of industries. Most Primavera P6 users do not get the opportunity to use many of the tool’s most advanced features, and many are not aware of all of the power that the tool possesses.
In this article we will explore some useful Primavera P6 tips and tricks, and shortcuts that each scheduler should know about.
Stop wrestling with Primavera XER schedules.
Your team can see your schedule without buying a P6 license.
Start Free Trial No credit card · Windows & Mac · From $344/yr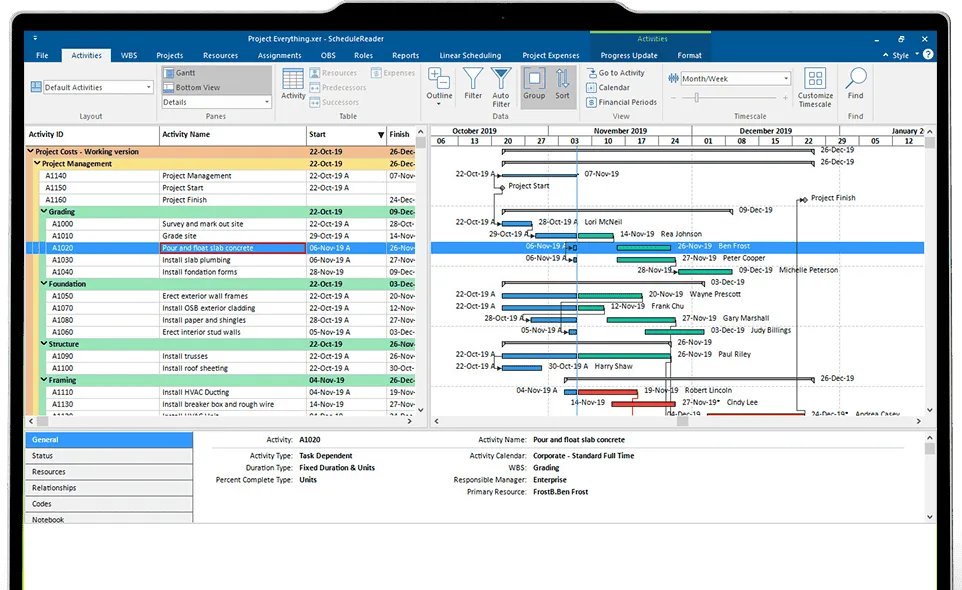
The Primavera P6 Tips and Tricks
#1 – Detecting Project Schedule Statistics and Issues Quickly – Log
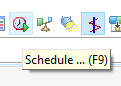
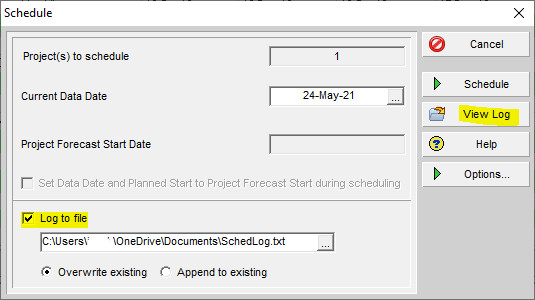
Project schedules may contain an array of issues or inconsistencies, and one of the easiest and quickest ways to immediately detect scheduling issues is to use the Schedule Log or View Log report. By simply using the F9 key, or using the View Log button at the schedule dialog prompt, a user can easily display a variety of analytical data within the project schedule:
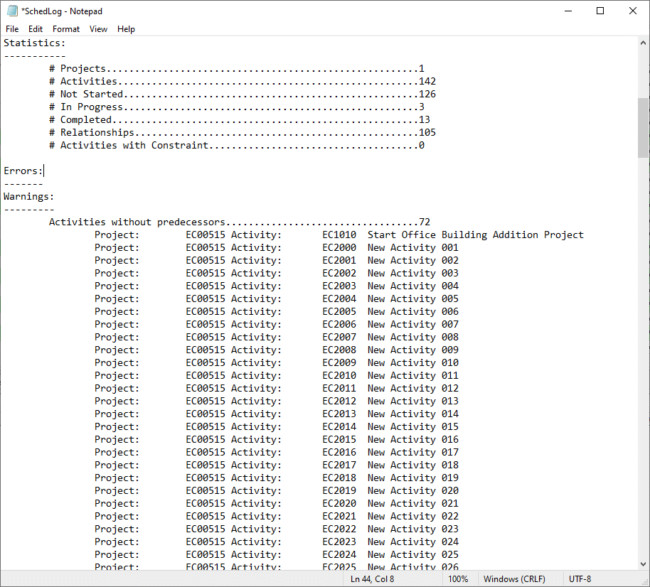
The schedule log presents a quick overview of important information in the project schedule. This information includes alerts or highlighted issues such as activities missing predecessor and successor activities and activities containing constraints:
#2 – Detecting Project Schedule Statistics and Issues in External Schedules with DCMA 14 Assessment
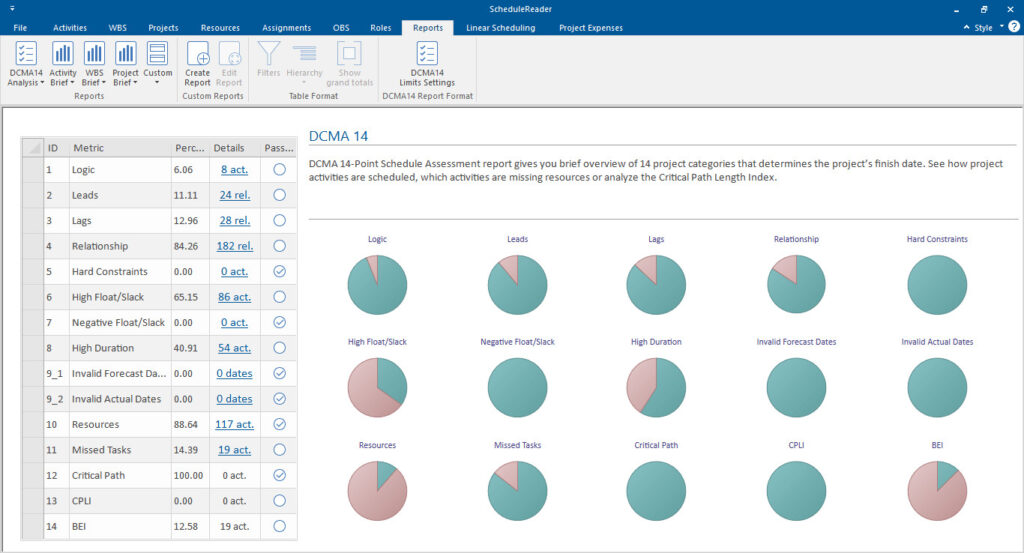
Another commonly used solution to check for issues and test the quality of a XER and XML schedules is by using the DCMA 14 schedule assessment framework.
With a companion tool such as ScheduleReader, you can easily check the health and logic of a schedule according to the 14 DCMA standards and visually present the findings in a report/dashboard overview.
#3 – Setting Up Your Default Settings from the Beginning
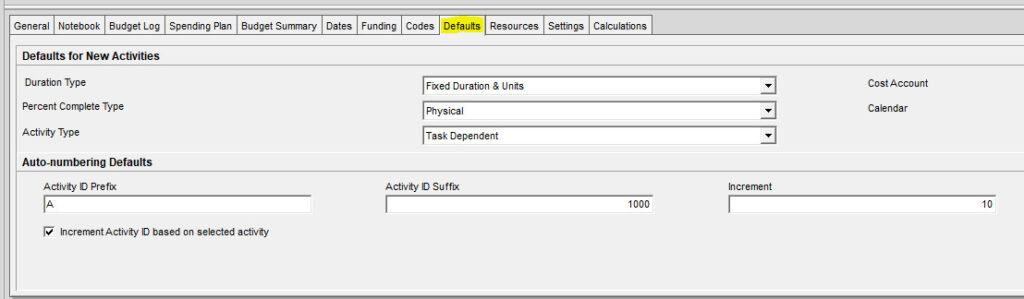
Use the bottom tab of the Projects window and select the Defaults tab to update the default settings for all of the project’s activities, such as the duration type or percent complete:
#4 – Making a Quick Time and Date Update
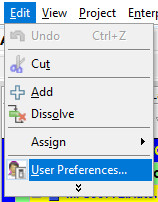
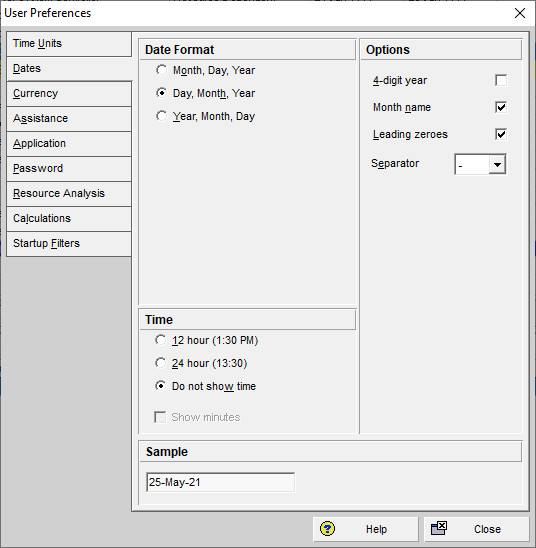
To easily change your Primavera P6 time units or date format, select User Preferences from the Edit tab or Alt-E-U:
#5 – Creating and Adding Your Custom Units of Measure in Primavera P6
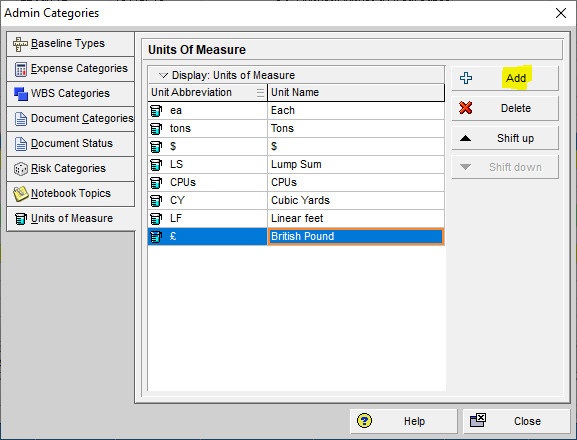
Primavera P6 comes with only a few units of measure in its default. To create a custom unit of measure, use hotkeys Alt +A + C or go to the Admin tab and select “Admin Categories”. In the Admin Categories dialog box, select “Add” and assign your custom unit. Any new units of measure will be listed in the dropdown menu when you create or modify material resources:
#6 – Quickly Fill-Down Information by Column
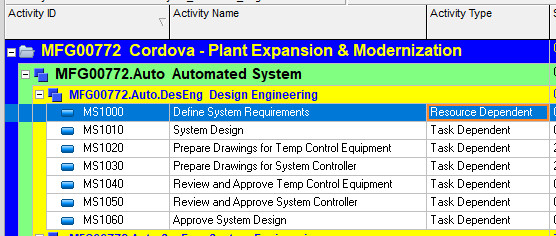
To fill down other schedule information such as activity type, select the first line in the column:
Highlight the desired selection and right-click and then choose “Fill Down”:
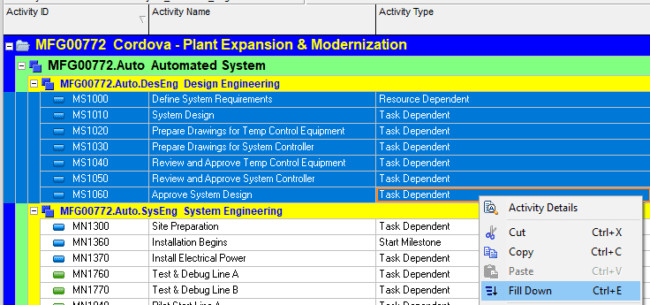
Alternatively, you can use the shortcut key of Ctrl-E:
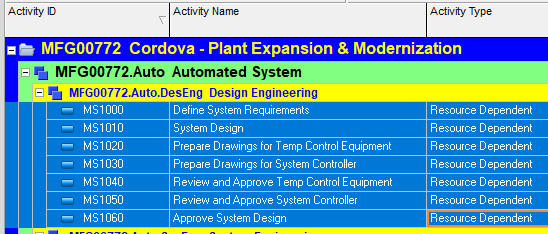
#7 – Quickly Renumber Your Schedule Activities
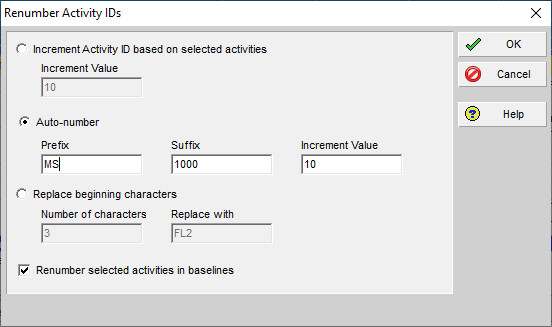
Instead of renumbering Primavera P6 tasks individually, select the entire schedule or a large portion of activities, then right-click on them and select “Renumber Activity IDs”:
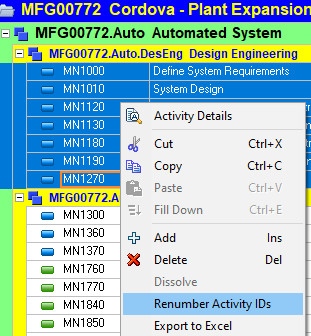
In this example, we will change the auto-number prefix of the schedule milestones from “MN” to “MS”:
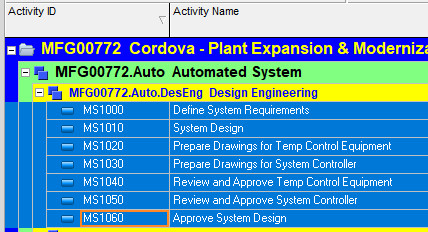
The result is the automatic update of the Activity ID prefixes for the selected schedule activities:
#8 – Disable the Dreaded Auto-Reorganization
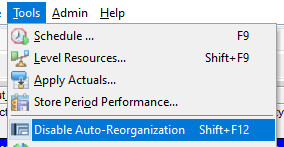
Grouped activities using a layout may entail auto-reorganization while updating the schedule, which means that activities may automatically relocate based on the updated information. To prevent this situation, use Shift-F12 or go to the Tools tab and select “Disable Auto-Reorganization”:
#9 – Sequence Your Schedule Activities
The Primavera P6 activities bar contains a small arrow in each column when you put your cursor over it. This allows you to quickly sequence the view of your activities in ascending or descending order. For example, you can sequence your activities in alphabetical and/or numerical order if you choose the option in the Activity ID column:

#10 – Using the Global Change to Update Project Information Quickly and Simultaneously
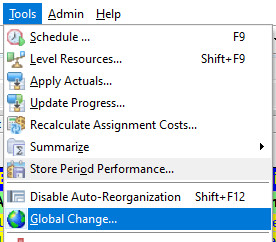
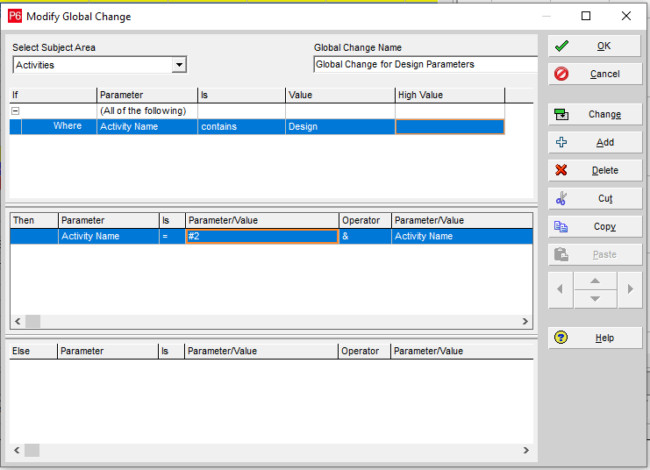
To create a blanket change throughout an entire Primavera P6 schedule, you will want to implement a global change. Simply go to the Tools tab and select “Global Change” or use the hotkeys Alt+T+G. You can create a new global change, and in the Modify Global Change dialog box, you can specify specific criteria to determine the changes that you want to implement once you commit the changes. This means that for example, you can alter the activity names of tasks that contain a certain word or phrase to something else.
#11 – Open Several Primavera P6 Schedules at the Same Time
Primavera P6 allows the user to work on several projects simultaneously and create logic ties among projects. In the main Primavera P6 projects menu, hold down the Ctrl key to select the projects of interest, and then Ctrl+O to open all of them at the same time. Likewise, Ctrl+W will close out all of the projects at once.
#12 – Scale the Primavera P6 Schedule to Appear on a Single Page
If you want to scale your Primavera P6 schedule to fit a single page, use hotkeys Alt +F + V or use the File tab to select “Print Preview” and then choose the Page Setup icon:
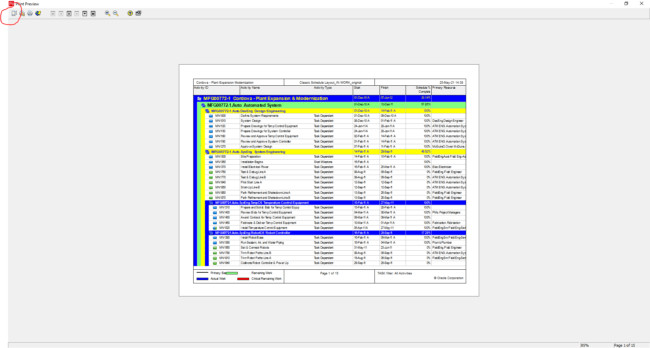
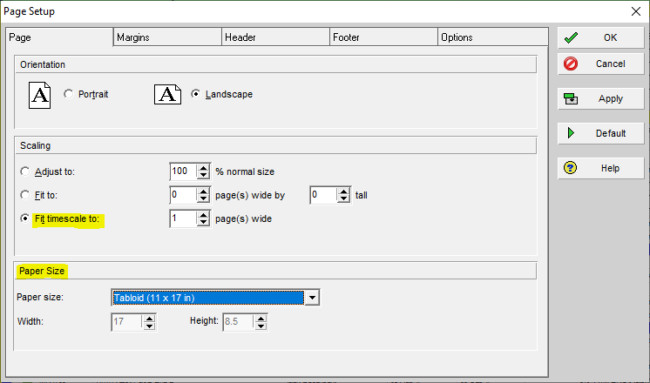
Choose the option to fit the timescale to one page. There is a better chance of fitting the full schedule to a single page if you choose a large paper size, such as tabloid:
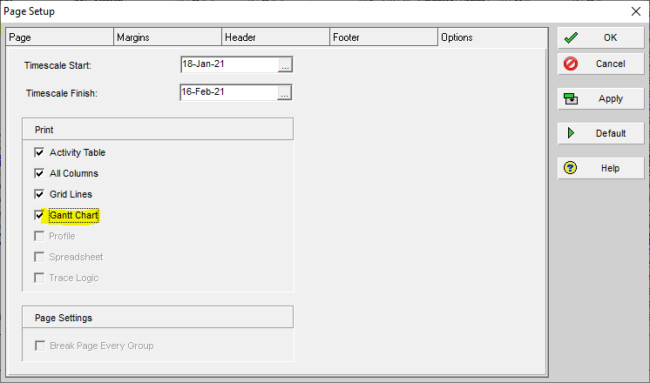
When it comes to the timescale, this does matter as far as the Gantt is concerned. On the options tab, if you do choose to select the Gantt option as visible, you will need to adjust the timescale start and finish of the project view to fit both the schedule’s columns and the Gantt onto a single page:
#13 – Quickly Find Your Activities
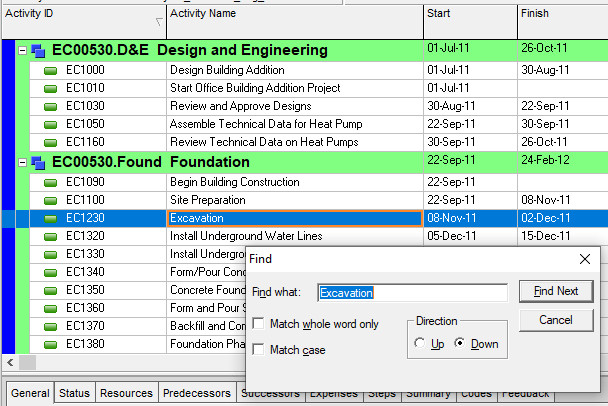
To find activities quickly in the Primavera P6 schedule, use shortcut keys Ctrl-F to perform a search:
#14 – Simple Export to MS Excel
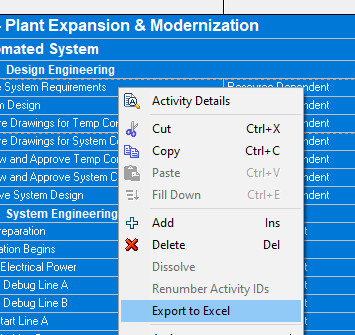
If a client requests Primavera P6 schedule activities in a more common format, you can export the Primavera P6 schedule to Excel within seconds. Use Ctrl-A to select all of the activities and right-click to select “Export to Excel”. Another option is to use Ctrl-C to copy all of the activities following the Ctrl-A, and then use Ctrl-V to paste all of the activities into a blank Excel file.
#15 – Import to Primavera P6 from MS Excel
In situations where bulk updates may need to be performed in MS Excel by the project team and then updated into the Primavera P6 project schedule, Primavera P6 allows the user to import from the MS Excel format into Primavera P6. It is most efficient to create a template first in Excel:
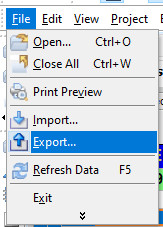
Export to Excel format:
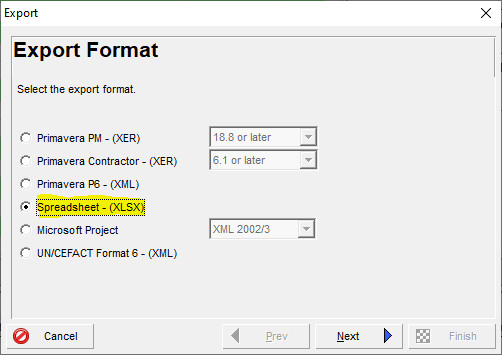
Select all of the elements that you are interested in exporting, such as activities, activity relationships, expenses, resources, and resource assignments. On the next screen, you have a choice to modify the template as well as save it:
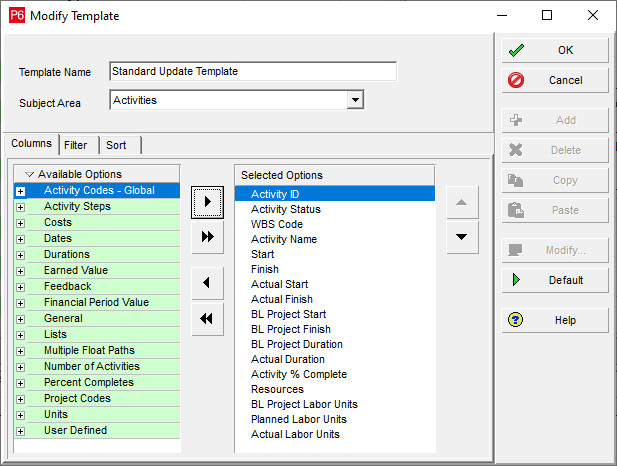
Next, import the Excel file:
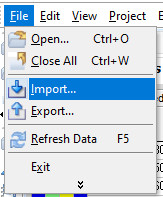
#16 – You Can Import and Export Primavera P6 Layouts
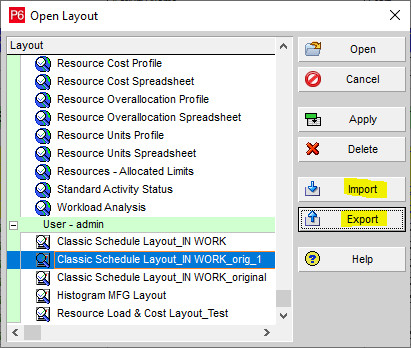
Primavera P6 layouts can be exported and shared with other team members. Go to the View tab and select “Layout” then “Open” and choose the layout that you are interested in. Click the “Export” button, and you can choose the location to export the layout as a *.plf file. Other Primavera P6 users can use the “Import” button to import the *.plf file.
#17 – You Can Export Primavera P6 Filters
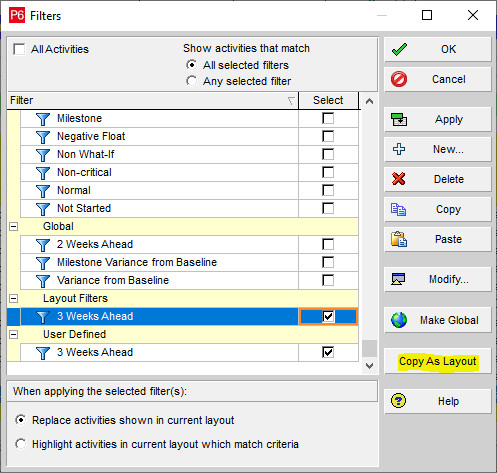
Similar to Primavera P6 layouts, filters can also be exported and used among team members. After creating a Primavera P6 layout and filter, use hotkeys Alt +V + F or right-click in the tasks and select the View tab, then “Filter By” and then “Customize”. Use your filter listed under “Layout Filters” and select “Copy As Layout”:
#18 – Use Key Delivery Dates and Crucial Events in the Form of Milestones
Many well-structured project schedules contain a separate section at the top of the schedule called “Key Milestones”. This separate WBS element helps to show important deliveries and key dates in the form of milestones:

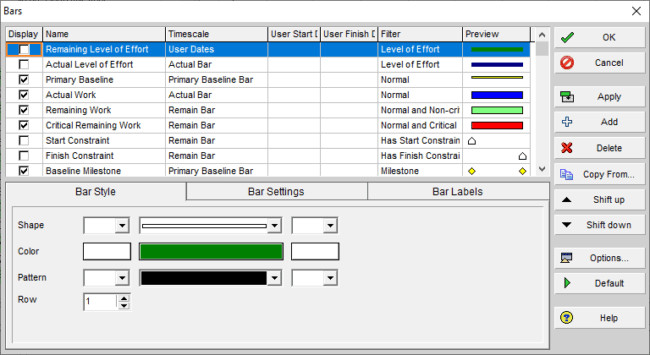
#19 – Formatting Bars in the Gantt to Make it Simpler to Translate
Use Primavera P6’s formatting features to present the Gantt in a format that is easier to interpret. Right-click in the Gantt portion of the schedule and select “Bars”. From here, you can adjust and customize the bars and colors to make schedule Gantt easier to read:
#20 – Formatting Bar Chart Options in the Gantt to Make it Simpler to Translate
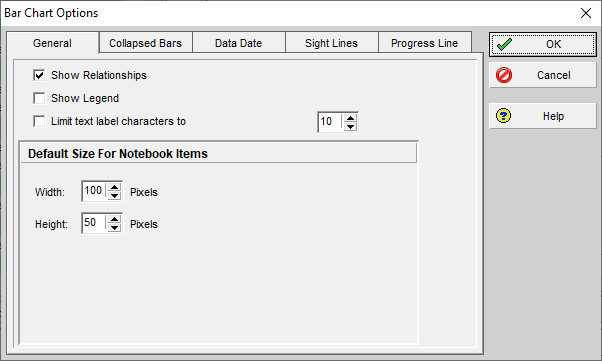
You can also right-click in the Gantt portion of the schedule and select “Bar Chart Options”. This allows you to modify features such as sightlines in the Gantt for easier viewing:
#21 – Easily Compare Primavera P6 Schedules
Export the schedule in .xer or .xml format and open the file with ScheduleReader.
ScheduleReader is a standalone software solution that visualizes the project data as seen in Primavera P6, apart from it.
Open one or multiple instances of the reader (to do side by side comparison), along side your P6 tool and easily compare schedules in a visual way across multiple different windows.
#22 – Make Quick Logic Ties (Finish-to-Start Relationships)
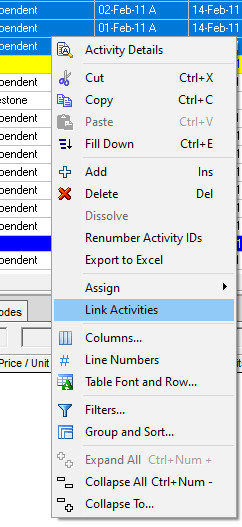
To quickly logically link project tasks in succession, highlight the tasks in question and then right-click the selection. Select “Link Activities”:
#23 – Viewing Project Variance Data in a Single View
When considering any type of variance in the project schedule, you must ensure that you have a baseline set for the schedule. Following this action, go to the View tab and select “Columns” and select any variance options listed in the Available Options section to move to the Selected Options section:
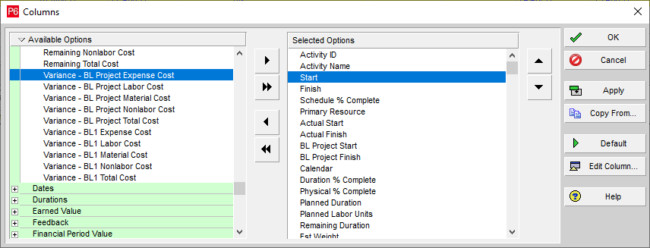
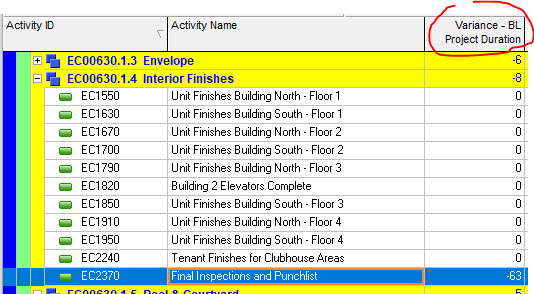
The variance columns will show any deviation from the project baseline:
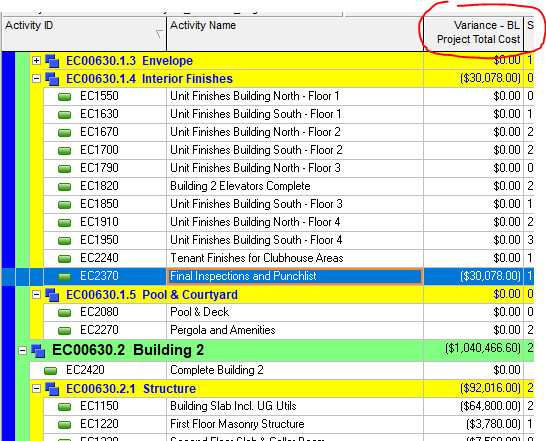
Variance factors not only include cost values but date or numerical values as well:
#24 – Longest Path, Total Float, and Critical Path
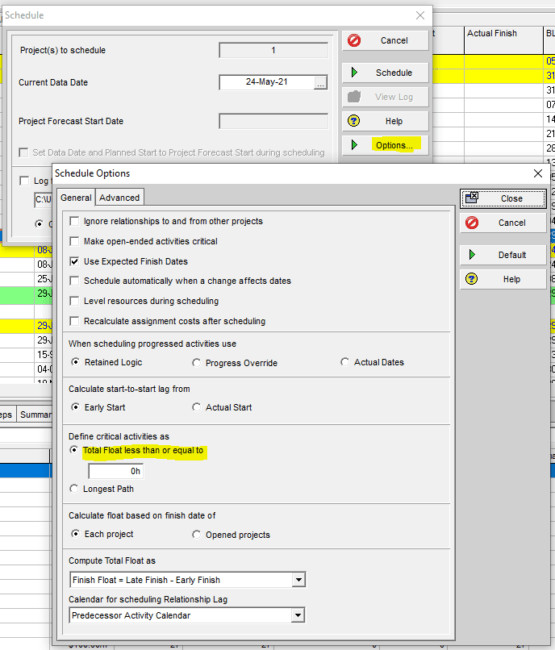
The Critical Path Method (CPM) determines the project duration by identifying the longest path of activities from the start to the finish of the project. Primavera P6 offers two options in its settings; Total Float Less Than Or Equal to (factor entered is typically zero) and Longest Path.
Longest Path may disregard activities considered critical in the Total Float method if they are not on a continuous path from project start to finish. The setting is determined by the personal preference of the Primavera P6 user.
To adjust the setting, use the “Options…” button from the schedule (F9) function under “Define critical activities as”:
#25 – Using Primavera P6 Steps to Add Schedule Details Without Increasing the Number of Activities
There are situations where a project team wants to capture schedule granularity at a more detailed level; however, the intent is to keep the schedule tasks to a minimum. This is where using Primavera P6’s steps feature is convenient.
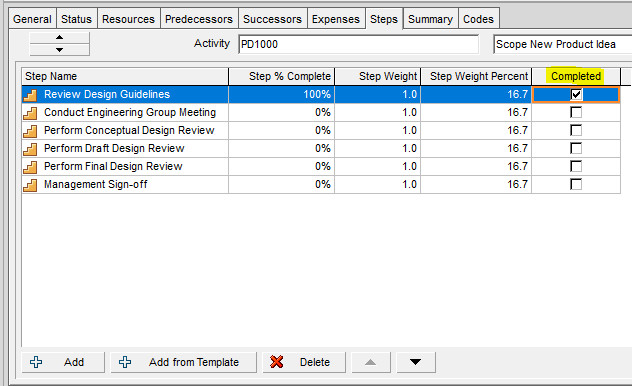
After selecting the project of interest from the Primavera P6 main projects menu, go to the Calculations tab at the bottom of the main projects screen. Adjust your setting to select a checkbox next to “Activity percent complete based on activity steps”:

From here, you can conveniently create weighted steps for each activity and measure performance based on the steps’ completions:
#26 – Take Advantage of Primavera P6’s Reporting Options
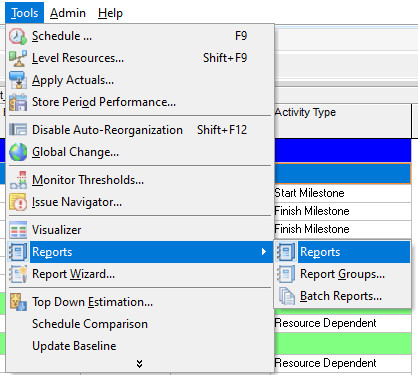
Use Primavera P6’s reporting options and choose from an array of standard reports that come with the tool. Use hotkeys Alt +T + P or go to the Tools tab and select “Reports”:
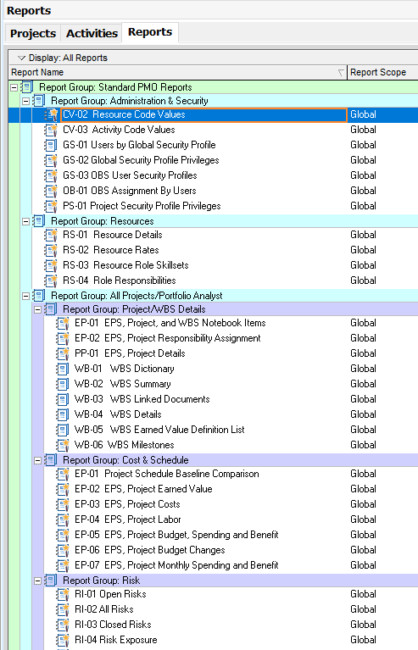
You then have the option to use one of Primavera P6’s standard reports or create your own:
#27 – Import an Older Version XER into a Newer Version of Primavera P6
While importing a Primavera P6 XER file into the database, if you receive an error message because the older file type is not accepted, there is a crafty way around the issue.
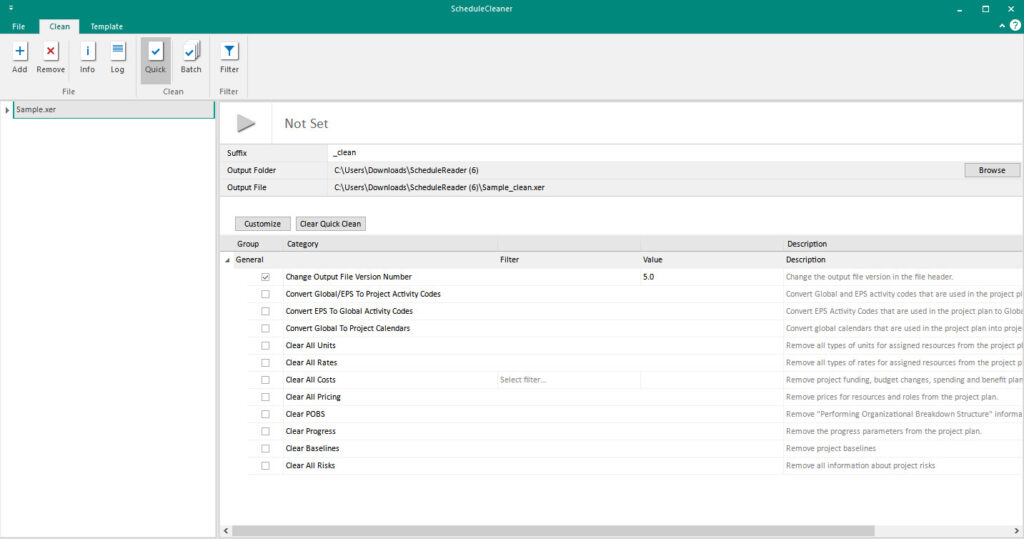
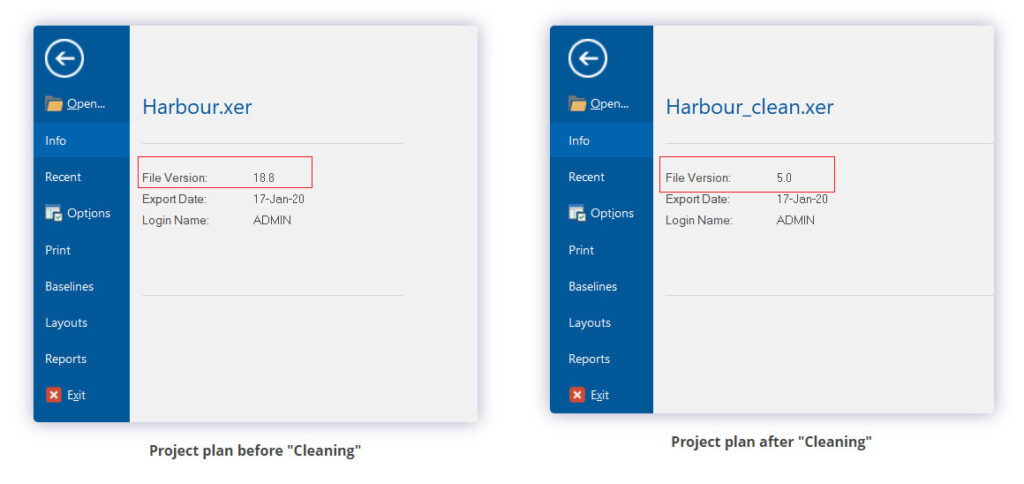
The ScheduleCleaner software, a new product that schedulers love to use to simplify some of their daily tasks, can help you change the file version from one to another with a simple click of a button.
Simply open the file with ScheduleCleaner, select the Quick Clean options, set your the desired version and press Clean. The software will create a copy of your .xer with the updated version.
#28 – Manage Primavera P6 Calendars to Efficiently Manage Tasks and Resources
Use the Primavera P6 calendars to efficiently manage tasks and resources in the project schedule. You can go to the main bottom menu to the General tab and assign the appropriate task calendar to the project schedule:
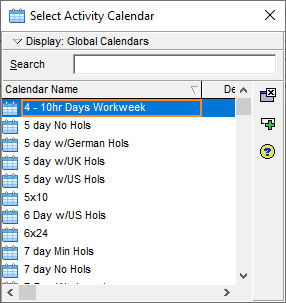
You also have the option to create a custom calendar if the calendar that you need to use is not already in Primavera P6.
#29 – Use Primavera P6 Resource Codes
Take advantage of Primavera P6’s features in the resource codes to create custom rates, overtime factors, and internal and external rates within different resource codes. Use hotkeys Alt +N + S or go to the Enterprise tab and select “Resources”:

#30 – Use Reflections to Minimize Errors When Making Significant Changes to Schedules
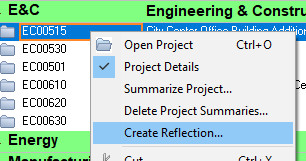
When the project team encounters situations where significant schedule scope changes need to be implemented, using Primavera P6’s reflections is an excellent way to minimize mistakes. The user can utilize reflections to make significant schedule changes and review them without the burden of those changes becoming permanent in the master file. A reflection allows the opportunity to create a “what if” schedule, and if the changes are reviewed and deemed acceptable, those changes from the reflection can then be merged into the master file.
Go to the Primavera P6 main projects menu and right-click on the project of interest and select “Create Reflection…”:
#31 – Identify Resource Over-allocation Easily
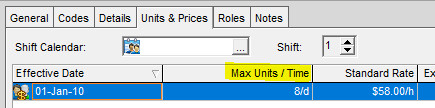
Resource management and allocation do not have to be difficult in Primavera P6. Use the “Mas Units/Time” column in the Units & Prices tab in the Primavera P6 bottom menu to assign the maximum limit for each resource expected to work. This setting will automatically calculate when a resource becomes over-allocated:
#32– Use Progress Spotlight to Highlight Activities that Need to be Updated
While updating the Primavera P6 project schedule, a team member can easily see which tasks need status inputs by using the progress spotlight. Use hotkeys Alt +V + P or go to the View tab and select “Progress Spotlight”:
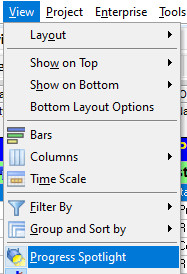
The tasks that require updates for the reporting period will show up as highlighted tasks in the schedule:
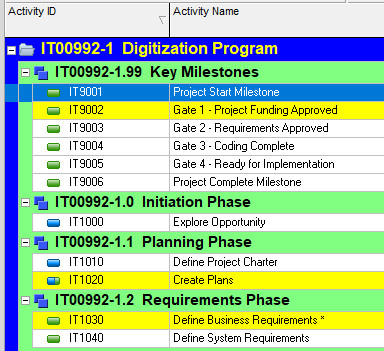
#33 – Use the Primavera P6 Split-Screen for Easier Viewing and Updating
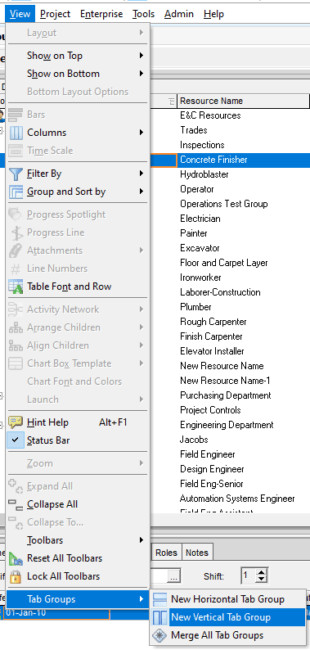
Primavera P6 uses tabs to overlap the different views and menus; however, there is a split-screen option that you can use as well. Go to the View tab and select “Tab Groups” and then “New Vertical Tab Group”:
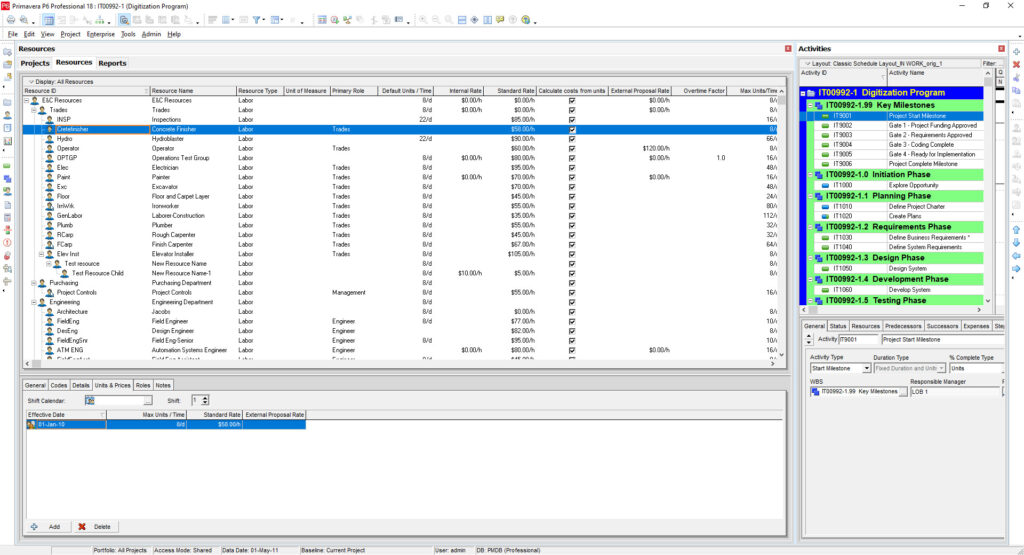
Here is an example of the split-screen view:
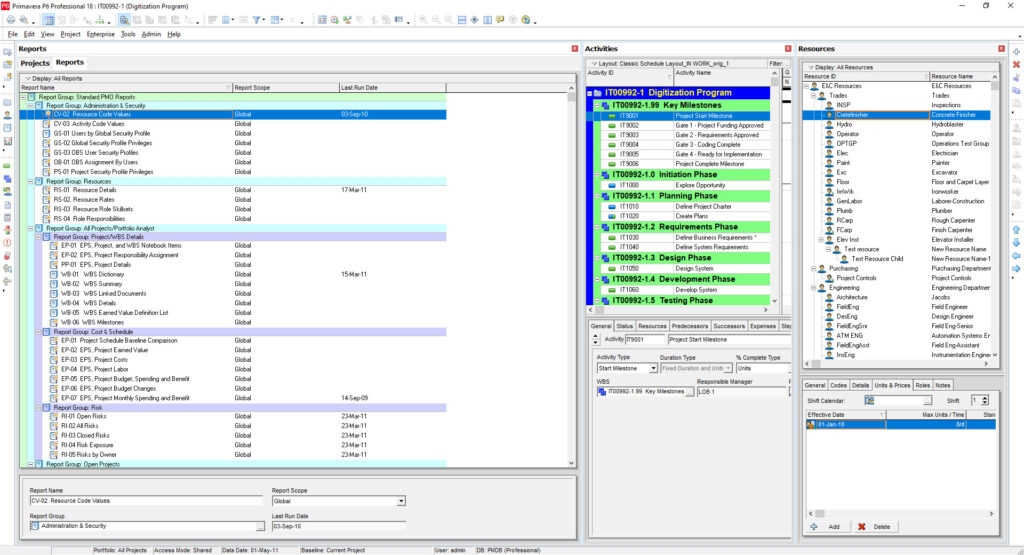
After repeating the previous step, an additional screen is added to the split-screen view:
#34 – On an Enterprise System with Multiple Users, Find Out Who is Logged into a Primavera P6 Schedule
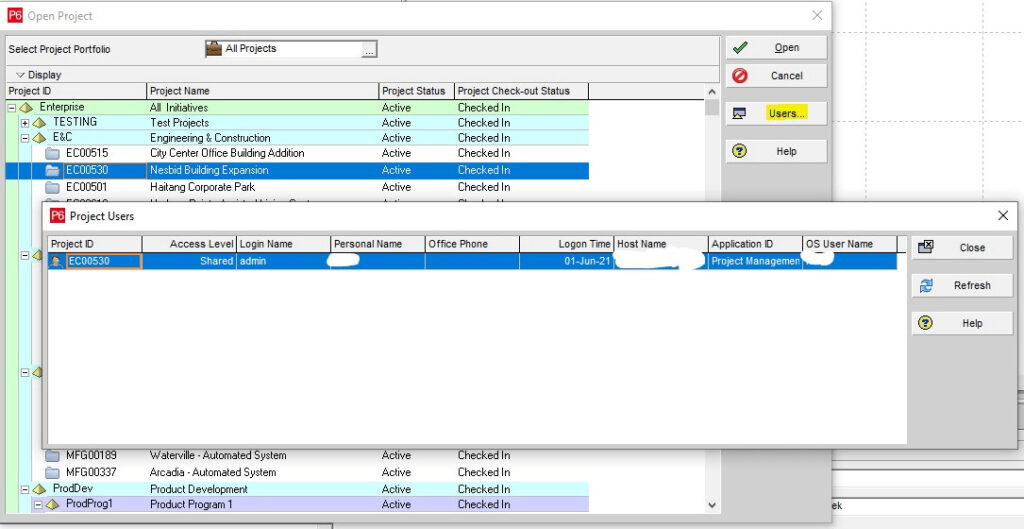
If you are a team member using a Primavera P6 enterprise system with other users, you can see who is currently checked into a schedule. Go to the File tab and select “Open” or use shortcut keys Ctrl-O and then choose the “Users…” button to view the current user in the project:
#35 – Who Made Modifications to the Project Schedule?
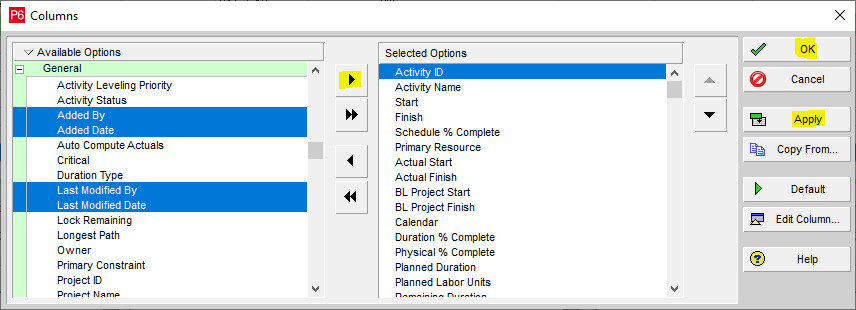
In the same Primavera P6 enterprise environment, you may encounter situations where it is helpful to know which user made a particular change or update to the project schedule. Right-click on the schedule columns to select the option to add new columns to your current view or go to the View tab and select “Columns”.
Add four new columns from the Available Options as shown below to the Selected Options section:
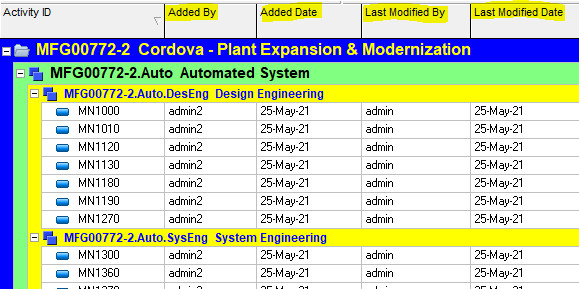
Now you can see the details:
Conclusion – Primavera P6 Tips and Tricks
Primavera P6 is a powerful tool that enables the project team to create and manage project schedules effectively and these 35 Primavera P6 tips and tricks can help you expedite the work being performed.

Experienced professional on the executive side of the business with nearly 20 years of knowledge and practice in: Project Management as a Program Cost and Schedule Control Analyst on multi-million/multi-billion dollar projects, Project Controls and Planning, Strategic Planning, Engineering Planning, Earned Value Management (EVM) and Earned Value Management System (EVMS) implementation, Configuration Management.